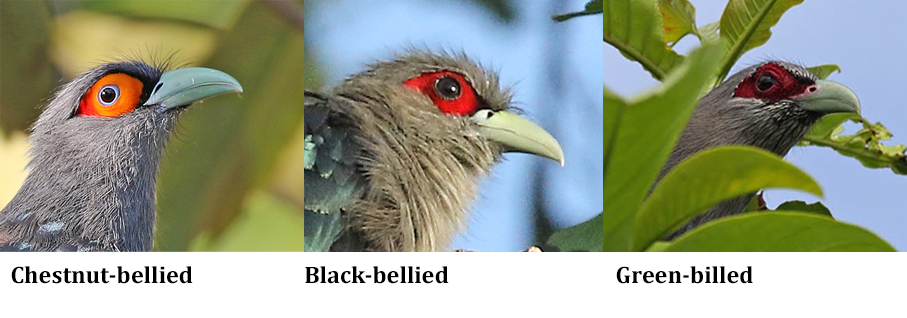
There are six species of malkohas on the Malaysian list (although one, Raffles’s, according to mtDNA studies, is not really a malkoha at all). Of these, Raffles’s, Red-billed and Chestnut-breasted are so distinctive that they are identifiable with all but the poorest of views. The other three, Chestnut-bellied, Black-bellied and Green-billed, are more similar to one another in plumage, and, although, with good views, they can be easily separated, their furtive behaviour means that, sometimes, good views of the salient details (such as tail length, belly and vent colour, and precise colours on the head) are not easily obtained. Additionally, juveniles are less distinctive than adults.
I won’t go into features which are already described in field guides here, but there is an additional detail not covered in literature that I have access to which can be surprisingly useful for determining identification, especially if photographs are taken; the shape of the nostril.
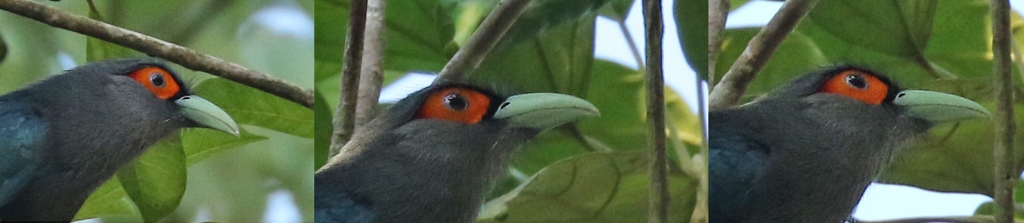
In Chestnut-bellied, the nostril is a long slit which runs parallel to the line where the bill meets the lores. In Black-bellied, it is shorter and more triangular – an apostrophe shape which runs vertically down from the top of the bill/lores line, at times appearing to be joined to the black of the lores. In Green-billed, it is more or less circular. These apparently small differences are surprisingly obvious, even in poor photos, and in the field, as malkohas characteristically stick their heads out of thick vegetation to look for prey.
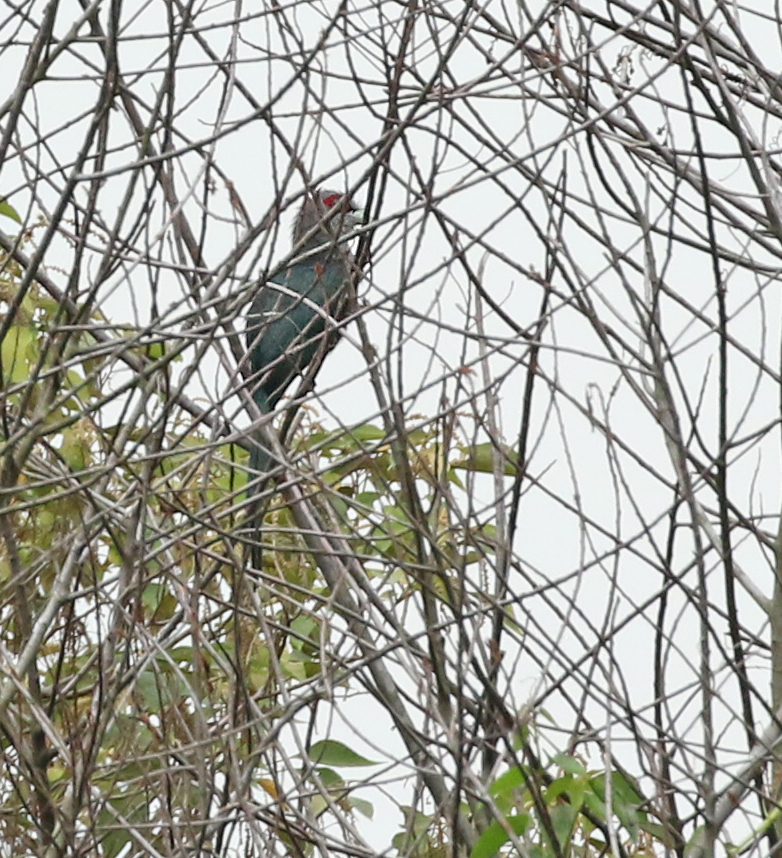
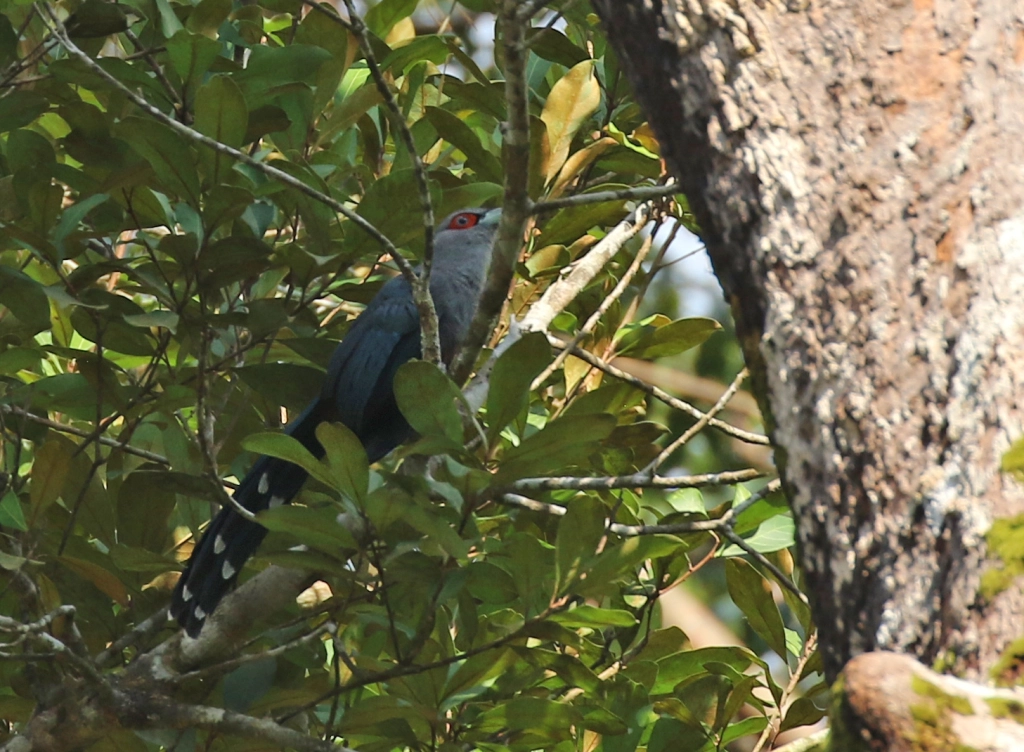
This malkoha was viewed distantly in an area where Green-billed and Chestnut-bellied Malkohas are known to occur, but where Black-bellied had not been recorded previously . The “field guide diagnostic details” are not easy to discern from this photo, and the bird did not move to allow any other angles. However, the nostril shape can be clearly seen, enabling an identification of Black-bellied Malkoha to be confidently made.The paler grey head than upperparts and blood red rather than orange facial skin suggest that this bird might be a Black-bellied Malkoha. However, the nostril shape shows that it is in fact a Chestnut-bellied Malkoha. The belly and vent colouration were not visible in the poor light of the forest. The head and facial skin colouration can be explained by the fact that this bird was a juvenile. It was in the company of two adult Chestnut-bellied Malkohas.Care needed! Note how the apparent shape of this adult Chestnut-bellied Malkoha’s nostril changes with angle, looking rounder as the observer moves more directly below the plane of the bill. Nostril shape is best judged when the bird is viewed in profile.
I plan for this to be the last post in this series, unless someone has a topic or burning question which you think I should cover.
Mike had a couple more questions in response to the first post in this series:
What is an appropriate level of confidence in an identity? Is it worth submitting a record without knowing the species (a potential first Subalpine Warbler sp. in Dubai, (Gray’s/Sakhalin Leaf Warbler in HK)
And he followed this up with this one in response to Post 11:
I would be interested to know – with the benefit of 20-20 hindsight – how or if you think your description of Pom Skua might have been framed to provide 100% proof? Did you not see enough? or could you have written more that would have reasonably eliminated Arctic Skua?
Since these two questions are somewhat related, I will deal with them together. First – full disclosure – here is the description I submitted accompanying those two awful photos:
“The first of the two individuals was spotted resting on the sea. It was too far to photograph with my lens, but was visible for 10 minutes or more, as the boat was not moving at that point.
The second bird flew south past the stern of the ship, and several very distant photos were taken.
Posture, size, shape
The bird on the water had the size and shape of a gull. The bird in flight was also gull-like, though with a more powerful flight.
Physical appearance
Bird 1: Sat on sea. Dark cap and upperparts and thick dark breastband. Face and neck whitish. Shape of tail projection beyond wings could not be determined due to range. Structure felt to be too bulky for either Long-tailed or Arctic. Upperparts too dark for Long-tailed.
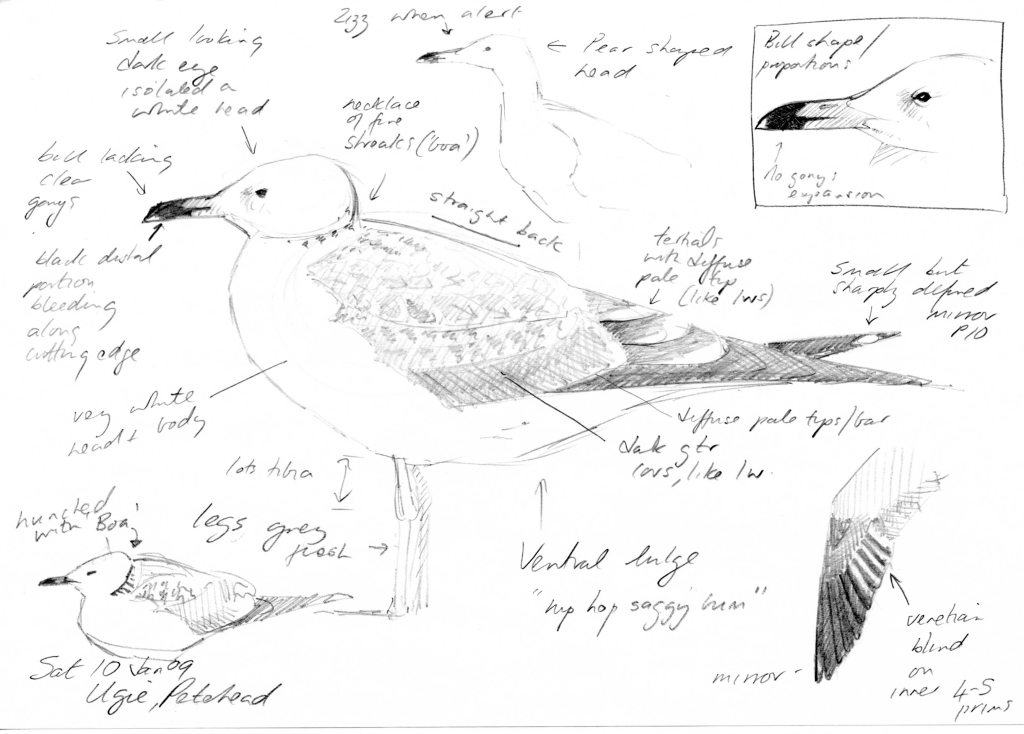
Bird 2: (see photos below) Flew with direct, powerful wingbeats past the stern of the boat about halfway to the horizon. Dark cap, pale underbody and dark wings and deep-chested appearance typical of Pomarine.
What do you think? Is there enough here to eliminate all reasonable doubt? Was I sure they were Pomarine Skuas? Yes. Did I provide enough evidence for this record to be accepted? I think not.
A question I always ask myself before I submit a record these days is, Would I accept this record (if I hadn’t seen it) on the basis of the evidence I have provided? I try to put myself in the shoes of those assessing the record and see it through their eyes. These days I would probably have put the skuas down as ‘probables’, because I could not prove the identification to others. I just didn’t see enough.
So, I think it comes down to confidence that you can demonstrate that you correctly identified the bird. Past experience helps, but it’s not essential. I’ve submitted quite a few records of birds which I had never seen “in the flesh” before.
Mike’s last question was:
How to make a case for unlikely records (e.g. Himalayan Griffon in Singapore)?
I think this comes down to the answer to two questions: 1. How confident am I that I’ve identified the bird correctly and can prove it? 2. Is there a possibility that the bird might have got there as a result of human interference?
To some extent, the second question is the job of the Records Committee to determine, which means you only really have to worry about the first. But if I do see a bird which I know might have suspect origins, I like to do a bit of my own research into regional patterns of vagrancy, whether or not other birds of the same species occurred in the region at the same time, and to what extent the species is traded or kept in captivity. I also want to pay special attention to unusual plumage damage or bare part abnormalities which might indicate that the bird had recently been in captivity.
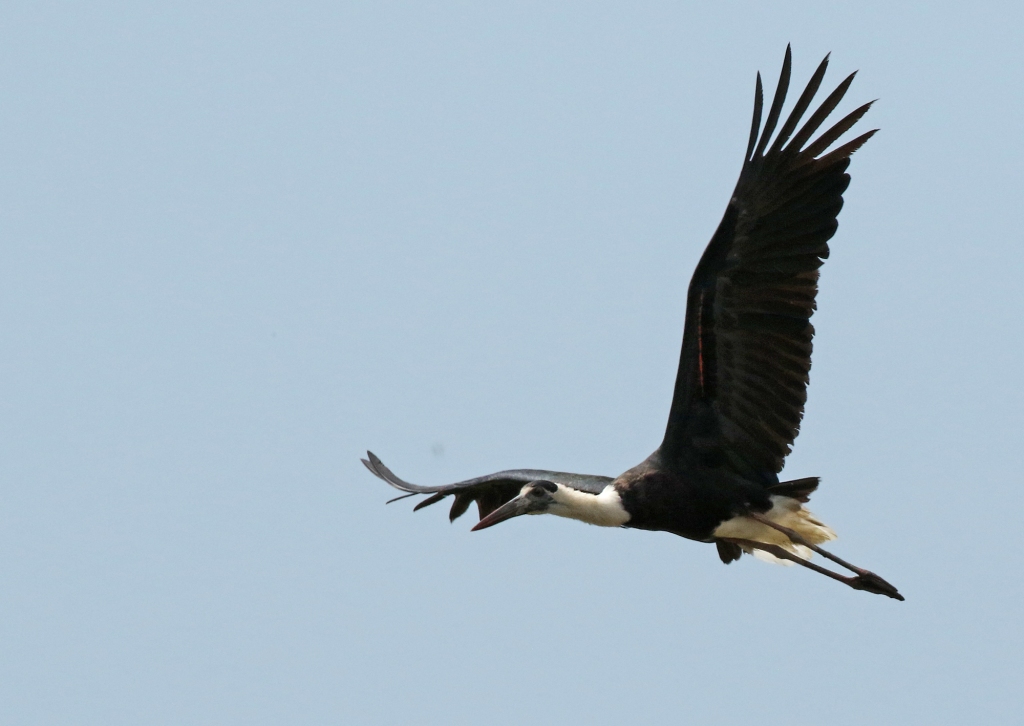
This Woolly-necked Stork was the first recorded in Malaysia for over a century. Since large waterbirds are a favourite in bird parks and zoos, I did a careful check for leg rings and feather damage around the eye and bill, and the tips of the flight feathers. After the sighting, I also made contact with Jurong Bird Park in Singapore to find out if they kept the species (they don’t).
Mike Kilburn’s third question to the first post in this series was:
How to manage atypical/contradictory plumage/bare parts/call that do not fit the classic/typical description?
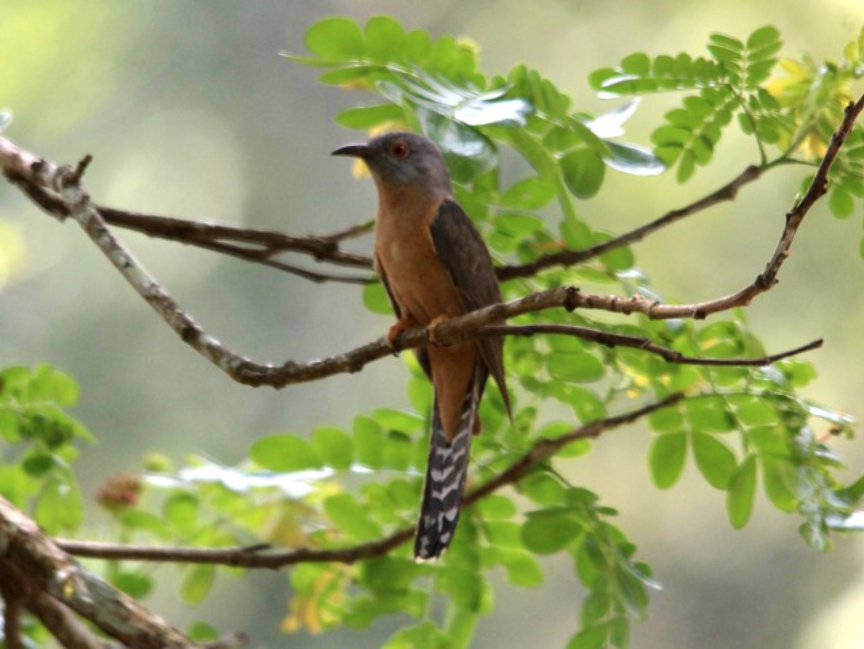
I’d like to use the quiz I posed at the end of the last post to help address this question. My challenge was: Take a close look at this picture and tell me what colour the eye-ring is!
The picture was taken by Lim Kim Chye and I reproduce it here with his kind permission.
This bird was identified as a Rusty-breasted Cuckoo on account, I suspect, of the orange extending up to the throat. On Plaintive, the throat and breast are usually grey. One of the key distinguishing features of these two species at all ages is the colour of the eye-ring – greyish or greyish-brown in Plaintive and yellow in Rusty-breasted.
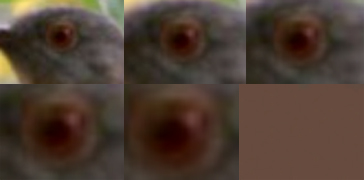
So what colour is the eye-ring of this bird? The answers I got from various respondents were: dull yellow, orange yellow, pinkish and pale grey – quite a variety! In the last post I said that we tend to be particularly bad at judging pinks, oranges and yellows, and this seems to prove my point!
In this montage, I’ve progressively enlarged the eye in the photograph, without doing anything to change the colours. In the last rectangle, I used the ‘colour picker tool’ in Photoshop to pick up the colour of the lightest part of the eye-ring (at the top). So that’s the actual colour of the eye-ring as it appears in this photograph – brown!
Maybe those of us who thought the eye-ring was yellow or orange were looking at the contrast between it and the red eye. Or maybe, since the bird is labelled a Rusty-breasted Cuckoo, we knew the eye-ring ‘should’ be yellow, and were influenced accordingly?
So, the eye-ring does not appear to be yellow. A contradictory bare part detail which does not fit the typical description. What do we do with that?
Look at the whole bird!
I’ve lost count of the number of times I’ve heard or seen people identify a bird based on a single, supposedly diagnostic plumage trait. I’ve done it myself. It’s a recipe for disaster. Don’t do it!
What about the rest of the bird? The grey head and chin grading into the rich peach-orange throat and underparts looks good for Rusty-breasted and not Plaintive. The wings are browner than the head, which is not particularly helpful, since both species share this feature. Ditto, the orangey-yellow feet. The undertail shows broad whitish bars which go across the whole feather, a feature of Plaintive Cuckoo, but not adult Rusty-breasted, which has much smaller whitish notches along the edges of the tail feathers.
So, despite the anomalous peach-coloured underparts extending up to the chin, this bird must be a Plaintive Cuckoo. My thanks to Ingkayut Sa-ar for pointing this out to me – I can’t say I would have picked it out otherwise.
In general, atypical characteristics in a bird which you think you know the identity of should set off alarm bells. They may be explainable, and your original identification may be right, but it is always worth double-checking and taking a cautious approach.
I’m using a series of excellent questions sent by Mike Kilburn as a springboard to explore issues related to writing and submitting descriptions of rarities.
2. One man’s buff is another man’s tawny or brownish, likewise with perceptions of length of bill, tail etc. How to deal with subjective perceptions?
In an earlier post, I suggested that length (of features like bill, legs, primary projection, etc) is best described in comparison to some other feature on the bird. So, for example, on a perched raptor, how far down the tail does the wingtip reach? Half the tail length? A third? Equal to the length of the tail? On a flying raptor, how long is the tail in relation to the width of the wingbase? On a wader, how long is the bill in relation to the distance across the head, or between the bill base and the eye? In making comparison between two unvarying lengths, some measure of objectivity can be obtained.
Foot or leg projection beyond the tail is hard to describe in relation to another part of the bird’s body. But one can make an estimate such as – just the toe tips (as in the Bar-tailed Godwits), half the foot (Asian Dowitcher), and the whole foot (Black-tailed Godwit).
On Grey-faced Buzzards in flight, the tail (best measured from the trailing edge of the wing) is longer than the width of the wing base (so it has relatively narrow wings and a longish tail). When perched, the wingtips reach the tail tip (so it has relatively long wings).
Describing colours is even more challenging than describing length! As Mike suggests, people’s perception of colour varies (Just ask my wife! Her “brown” is my olive green!), and we have limited vocabulary to describe a myriad of subtleties.
Fortunately, in most cases, the key is comparison again. So, whether one describes a redstart’s tail as rufous, red, orange or chestnut, it’s more important to note that it is more rufous/red/orange/chestnut than the rest of the bird’s upperparts. Plumage patterns are usually more important than colours in isolation. So, on a warbler, is there a brighter secondary wing panel? Or does the alula stand out as being noticeably darker than the rest of the wing? Is the eye-stripe the same colour as the crown or distinctly darker?
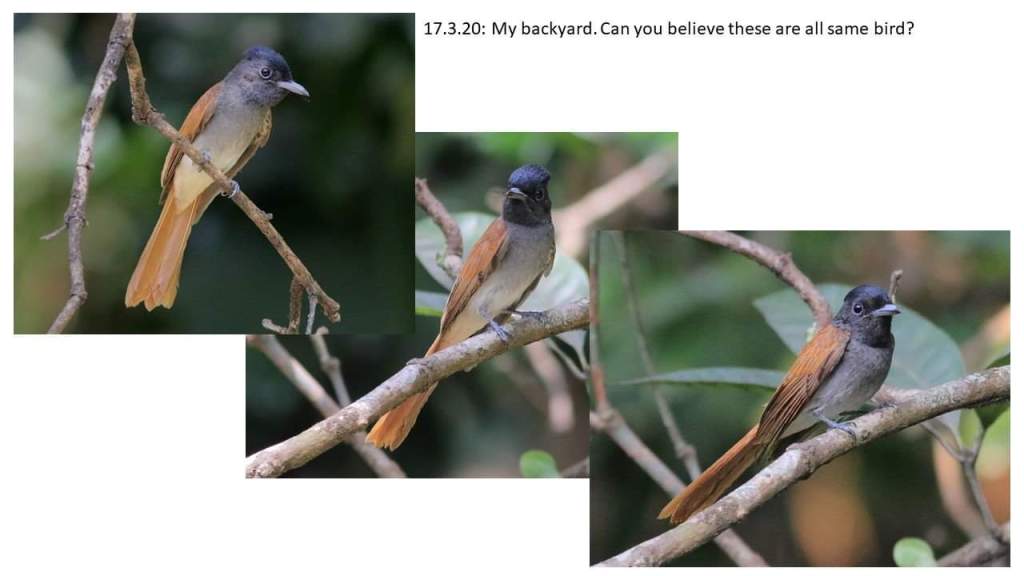
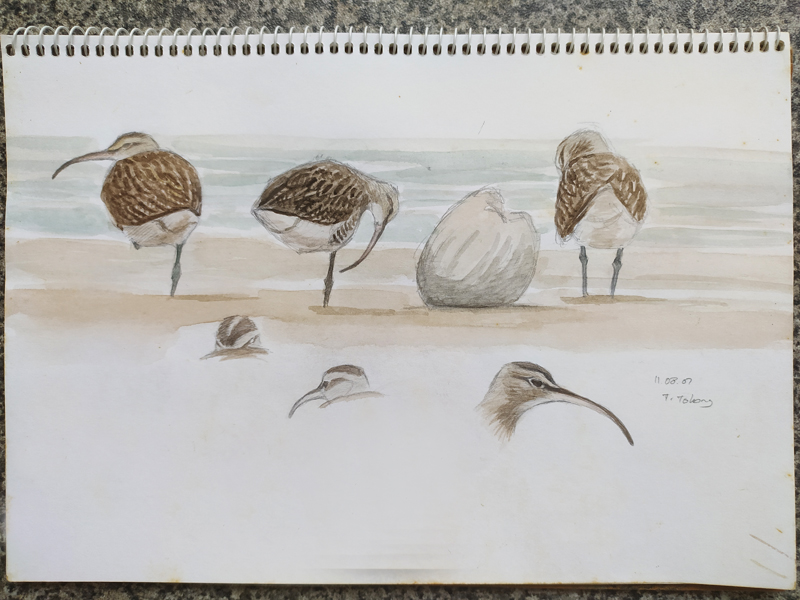
This is an area where taking notes while in the field can be extremely valuable. Photographs don’t lie, but they might not tell the whole truth!
A paradise-flycatcher photographed by Chin Choong Liung. Each photograph seems to tell a different story about the extent of dark grey on the head. Only sustained and careful field observation would be able to discern which of these is more representative of the bird’s appearance.
Sometimes, description of colour in isolation is important – the colour of a wader’s or a gull’s legs, the colour of an eye-ring, or the precise shade of the upperparts of a gull or tern. And in truth, we are generally not good at this. 1. We tend to overuse the descriptions black and white. Pure black or white is rare on bird plumage. It’s usually a better practice to use terms like dark, very dark, blackish or pale, bright, whitish.
How much black or white is there on this Blyth’s Pipit’s head and upperparts? Apart from the pupil, not a lot!
2. We seem to be particularly bad at discerning between shades of pink, yellow, and orange. Try describing the pale part of the pipit’s bill in the photo above, for example. That’s partly because colour is reflected light, and as lighting conditions change constantly, so will our perceptions of colour. Again, over-reliance on photos is not helpful. This is another area where field notes taken while watching a bird over a period of time can be more reliable than single photos.
Finally, it’s good to remember that a good description bases identification on multiple factors, not just one or two characteristics, so, even if our perception of some colours is “off”, the rest of the description should hopefully override this.
I’ll end with a bit of a quiz question. Take a close look at this picture and tell me what colour the eye-ring is!
Mike Kilburn posed some excellent questions in this blog post, which I promised to respond to. So, here goes.
1. Is it worth submitting records if the information is incomplete – i.e. not all parts of the bird are seen? (tail on a Black-throated Thrush in HK)
It is relatively rare that an observer manages to observe absolutely everything. The bird may not be seen in flight, or it may not vocalise, for example. The important thing is to be honest about this in the description. Incomplete details do not necessarily mean that the record cannot be deemed acceptable.
In the case you mention, however, the detail not seen is critical, because the presence or absence of rufous in the tail determines identification. So, should you submit the record?
The advantage of submitting the record is that it adds to a body of information from which patterns of occurrence may be inferred in the future, even if the record is not deemed acceptable on its own. Here’s another example: Red-billed Starlings, like most sturnids, are commonly traded and so, here in Malaysia, there is a fair chance that individuals encountered in the wild may be escaped cage birds. But, if all records are submitted, it should eventually be possible to determine whether there are any seasonal patterns which might suggest genuine vagrancy or otherwise. So I would favour submission.
I would add that there are two types of record submission. The commonest is a submission which makes a claim that a certain species has been seen, and the Records Committee then assesses the validity of that claim. So, in this case, the observer could decide whether to submit a claim of Black-throated Thrush, or of Black-throated/Black-throated Thrush hybrid. The other type of submission is more speculative – here’s a description of a bird I saw – what do you think of it? In such a case, there is no claim to be assessed, though the committee might subsequently recommend that you submit one.
The Malaysian Records Committee tries to avoid the accept/reject dichotomy (although those terms are still commonly used). We instead think in terms of “proven/unproven”. So, an “accepted” record is one which we feel the evidence provided proves the identification beyond reasonable doubt. A “rejected” record is one where the evidence provided does not reach that level of confidence. It does not mean that we think the observer has behaved dishonestly, or that they were mistaken. It just signifies that the evidence supplied left room for doubt.
Here are some pictures of a skua I saw with Simon Buckell in March 2008 off Penang. We saw two of them. Both of us identified both of the birds as Pomarine Skuas. We’d both seen plenty before. I wrote a pretty good description of what we saw. I was Chairman of the Records Committee at the time. The record was rejected. I felt quite proud of the Committee! I was 100% certain of my identification. But I also agreed that I did not provide enough evidence for this record to be 100% proven.Fortunately I’ve seen plenty more since then, a little closer!
As Bill Oddie once wrote, one of the big the differences between birding and train-spotting is the element of chance. If you’re an avid train-spotter, with enough money and time, and an accurate train timetable, you can see every train out there with some level of certainty. With birds, things are much less predictable, and it’s precisely this element of chance which makes birding so exciting and, yes, addictive!
Over the last 40 odd days, many of us have been confined to our homes by the COVID19 virus. I decided to try to spend some time outdoors every day to see what birds are around my home (I have fairly recently moved house). At the beginning of the period, everything was new, everything was interesting. But after 6 weeks of seeing more or less the same species in more or less the same places at more or less the same time of day, it is the chance of the thrill of finding a new bird for my “patch” which keeps me going out. It’s the same with birding your local area, your state, your country or even, for some people, the entire planet. Everyone loves to see something new!
The fact that seeing something new is desirable can itself be a problem. The desire to see a new bird can mess with our head, and mistakes can be made because we have a natural bias to want it to be something rare rather than something common. So there’s a need for caution!
When I come across something which looks a bit different, I can feel it physically! The heart starts to beat a little faster and the adrenaline starts flowing. Nine times out of ten, that excitement is short-lived as I realise, on closer inspection or with a clearer view, that what I thought might be something rare is in fact something common.
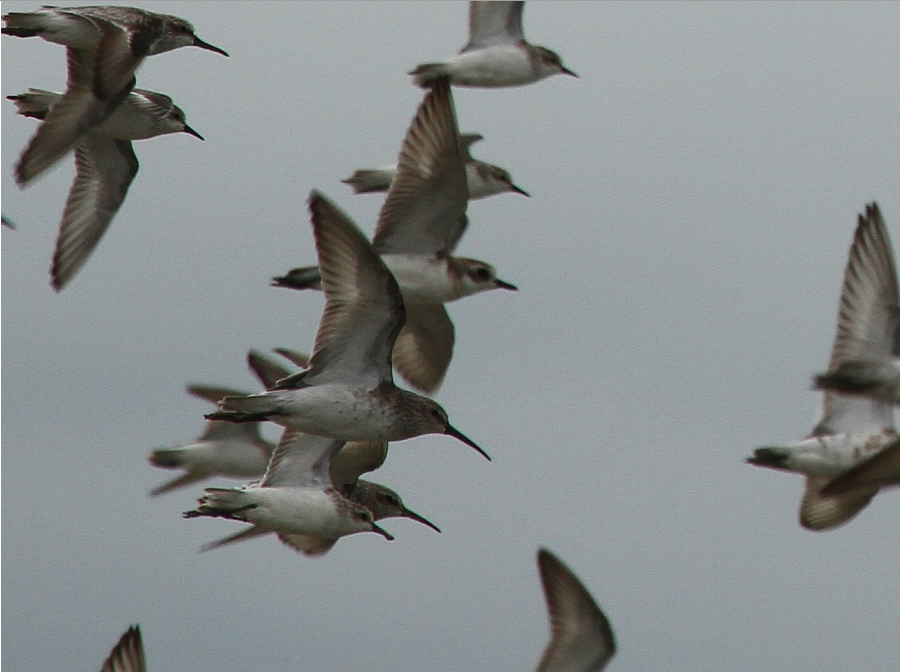
Spoon-billed Sandpiper is the holy grail of East Asian wader watchers, so it’s natural that the lowest bird in this frame would make the heart leap! But is it one?
This process of re-evaluation and admitting when one has made a mistake is healthy and should not be a cause for shame. Everyone makes mistakes, it’s just that most of us don’t want to admit them! If I am birding with someone else, I would much rather they call my attention to a bird they think is rare, even if it turns out not to be, than for them to say nothing until they are sure, and it has disappeared from view!
So, first impressions can be mistaken, and that’s OK. Rarities are called rarities because they don’t come along very often!
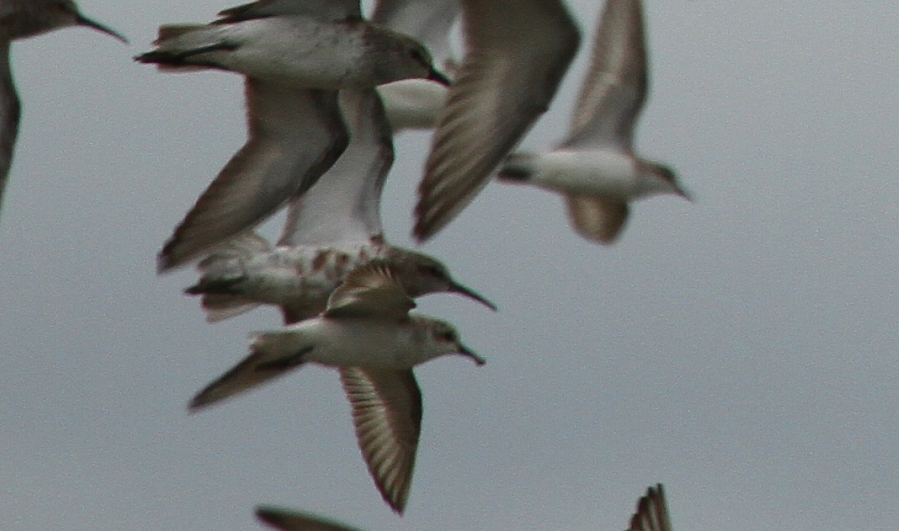
Another angle reveals that the “spoon” at the end of this bird’s bill is actually a lump of mud!
If I think I might have found something unusual, here are the first things I try to do:
Stay on the bird! The temptation might be to immediately look away try to get others onto the bird, and in the excitement, it’s easy to lose it altogether. So I try to fix the position of the bird in my mind (by noting its position relative to other birds or bits of vegetation, etc.) until I am pretty confident I can refind it again. If I don’t think I can confidently refind it, I will keep watching the bird while trying my best to describe where it is to others present.
I will try to keep watching it until I am as certain as I can be of what I am seeing (or at least until I am sure it’s something new), making mental notes of the key identification features I can see. As soon as I have these, if it’s feasible, I will switch to the camera to try to get some photos, or to a recording device, if the bird is calling and its vocalisations are distinctive.
Even as I switch to the camera, I will keep trying to notice things, like its size relative to other birds, its behaviour, etc. and I will be asking myself, “Why is it not a…[whatever the common alternative is]?
Once I think I have enough data to have “nailed the identification” (which may be a combination of getting decent enough photos, sound recordings and mental notes), I will try to make a record of my observations (usually via the voice recorder on my phone these days), and I will continue to do this while simultaneously watching the bird for as long as I can.
By this time, if the bird is still present, things will have calmed down a bit internally, and I can start to enjoy watching the bird. It’s also time to think about “getting the news out” (letting others who are not present know about the bird). There a few things to consider in this regard:
The welfare of the bird, and other birds/wildlife in the vicinity – how would they be impacted by large numbers of people visiting? Are there nesting birds in the area? Every situation is unique, so you have to make a decision based on the information you have
The local (human) community – how would large numbers of visitors affect them in their privacy or ability to earn their livelihood? Will parked cars block access roads or be a traffic hazard? Might crops be damaged?
Consider asking local people about these things, and respect their views.
If large numbers of birders arriving simultaneously would create problems, consider a phased release of the news, so that only small numbers of people come at any one time. This is difficult to manage, as it relies on others respecting confidentiality, but I have seen it work well in some situations.
As soon as the bird has definitely gone, or as soon as I take a break from watching it, I will try to write down or record more detailed notes (to be transcribed later). These notes will become the basis of a more formal written description which I will write up later to document the sighting.
Most countries have a National Records Committee which assesses rare records, and they usually have a standard Record Submission Form to be filled in. The one for Malaysia can be downloaded here. The same page gives more hints and details about how to complete the form. I will usually wait till the bird has left the area before submitting the form, so that I can fill in the last date seen.
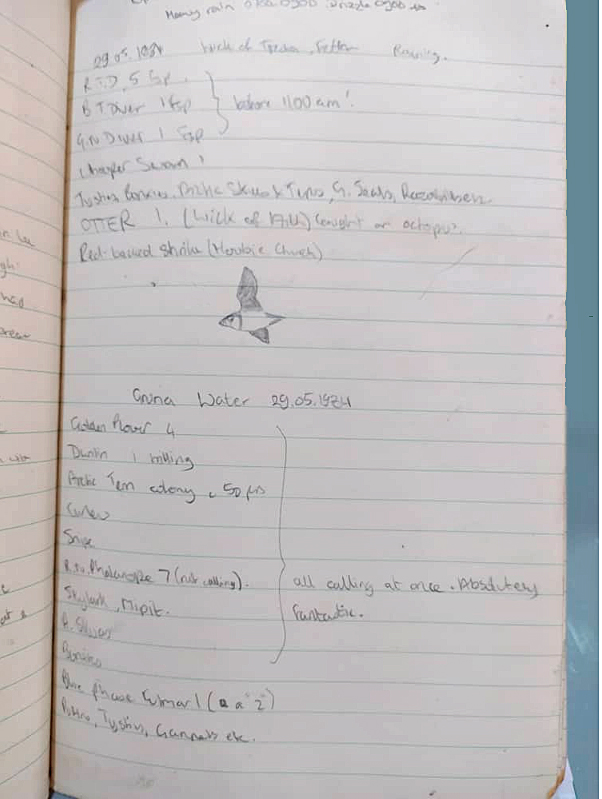
With more challenging identifications, some sightings may not be identified to species level immediately, or even ever! Even in such cases, the discipline of observing and documenting well is rarely wasted. For example, during this lockdown period I have revisited an observation I made 7 years ago, which, it turns out, may have been something a lot rarer than I thought at the time. Fortunately, I still have my notes and photos.
For the last few posts I’ve been focusing on describing what a bird looks like (specifically, plumage details). But to get a good, full description, there are several other aspects we must also pay attention to. These include:
Behaviour
Size & shape (perched and in flight)
Vocalisations
Habitat
Behaviour:What is the bird doing (e.g. flying, foraging, etc)? Is it doing anything distinctive with its body (e.g. wings, tail, etc)? Is it calling or singing (see below)? Can its behaviour be compared to other species nearby (e.g. it feeds more actively or more sluggishly than x)? Does it appear to be shy or confiding?
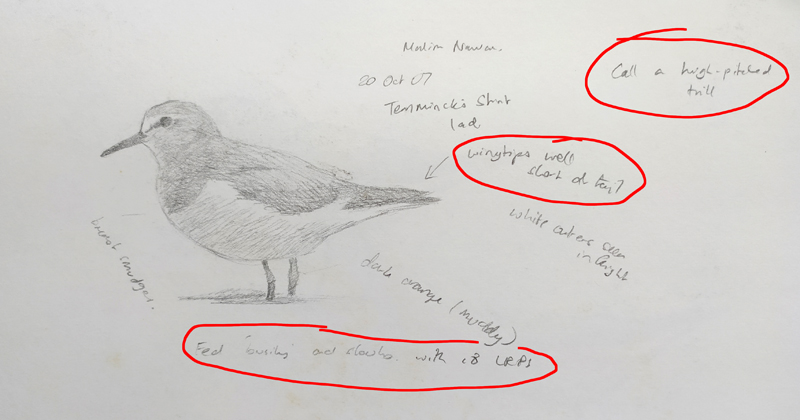
Fieldnotes on Temminck’s Stint including notes on feeding behaviour, shape and call.
Shape and size: Both shape and size are best described in comparison to something else. For example, “slimmer than a sparrow”, “longer-winged than a swallow”. Shape and size should be estimated ‘live’ rather than from still photos.
In different groups of species, there are certain parts of the bird to pay special attention to; for example, the primary projection in warblers (e.g. two thirds of the exposed tertial length), the length of the wings relative to the tail (e.g. slightly shorter than the tail), bill length (e.g. 1.5 x the head length) and leg length in waders; the wing shape in flying raptors, etc.
A word of caution about describing size. When viewing a single bird (or group of the same species), particularly in the absence of other ‘size referents’ (something of known size), it can be very difficult or impossible to make an accurate estimate of size. This is particularly true of a bird against the sky or sea. Even when there are other species present for direct comparison, ensure that you compare them when they are as close together as possible, and at similar distance from you. “Size illusion” is such a ‘big deal’ in birding that there have even been several scientific papers written about it. Here’s the seminal paper by Peter J Grant.
Size is particularly difficult to estimate in the case of birds in a clear sky at differing distances from the observer.
The posture and angle of the bird from the observer can also affect size perception, so it is important to check one’s first impressions. For example, this nightjar looks much larger than this one but they are both the same species. Because of the posture of the bird in the second photo (eye wide open, fluffed up), our mind can make the assumption that the bird is small, whereas, in the first, where the bird has pressed its feathers close to the body, it looks long and slender, and large.
Vocalisations: Calls (contact calls, threat calls, alarm calls, flight calls, etc) tend to be short and simple; songs (generally but not always made on or near the breeding grounds) are usually more complex and ‘tuneful’. The simplest and best way to make a note of them is to record them on a device such as a sound recorder or a mobile phone. Failing that, it is possible to make written notes on vocalisations. One can use comparison (sounds similar to…), description (e.g. a musical trill, a series of staccato notes slowing and descending at the end, etc.), writing what the call sounds like (e.g. “cuckoo”, “ko-el”, “caw”, etc), or your own personal symbols to mimic the sound.
My efforts at writing down the calls of Bornean Green Magpie and Bornean Whistler
Habitat: Where a bird is found is a very important aspect of identification. Both the macro-habitat type (e.g. montane mossy forest, mangroves bordering rivermouth, etc.) and the micro-habitat (in the canopy, in tangled undergrowth near the ground, etc.) should be noted.
Practice!
Write down a description of differences in size, shape and behaviour of the two species in this video.
Write a description of the vocalisations of the bird in this video.
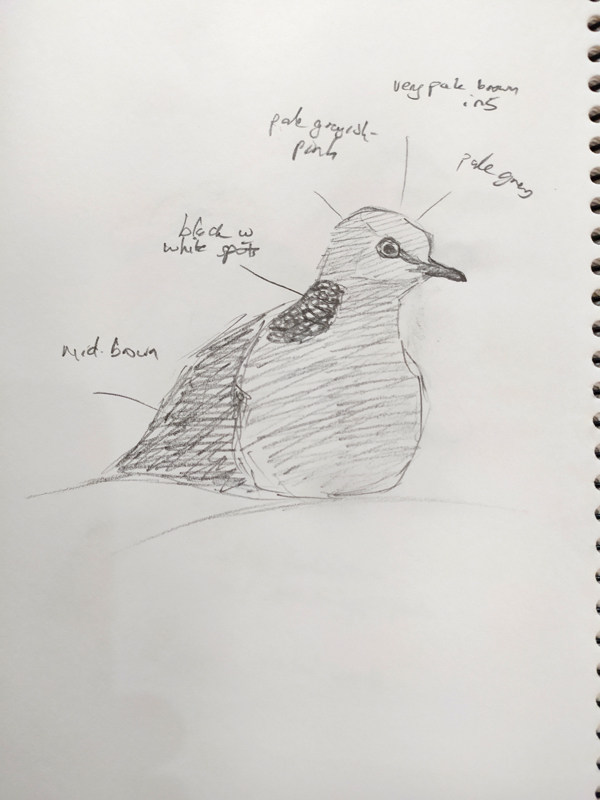
The initial drawing of the outline is very manageable. But once it comes to filling in the details, just somehow can’t get it right. Need to do more practise.
Mark, you are right about practice – that’s key. But perhaps there are a couple of other ways I can suggest to avoid getting overwhelmed by details.
A really simple one I have mentioned already. With field-sketching, bigger is better!
A field-sketch of a probable Puffin! But with a sketch this small, the slightest slip of the pencil can make a huge difference, and it’s hard to add any details. Later, I learned to sketch BIGGER!
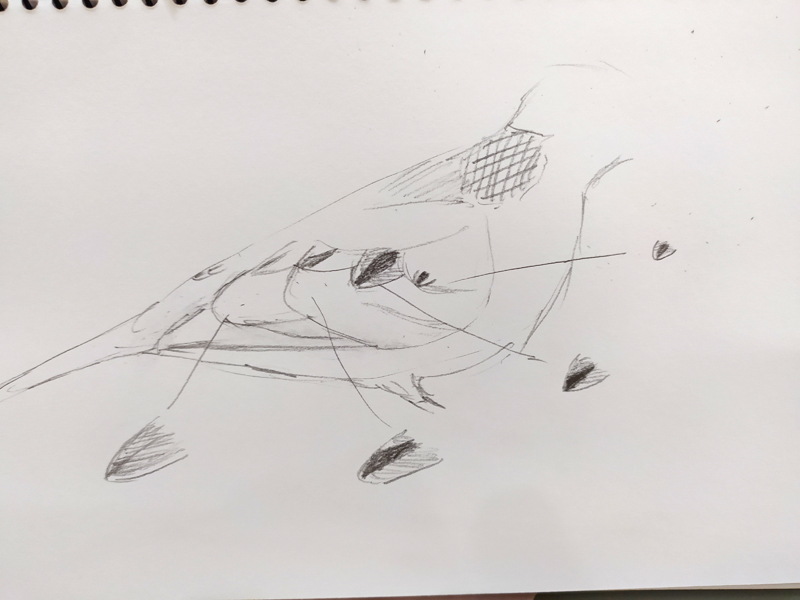
2. If patterns on feather tracts are complex, just focus on a feather! Field-sketching is always a trade-off between accuracy and speed. You have to be fast because you don’t know how much longer the bird will pose for you. But you need details as well. This is where a knowledge of feather tracts comes in useful. Rather than sketch the whole wing, just draw one greater covert, one median covert, etc (assuming they are all similar patterned).
But when the bird turns sideways, the amount of ‘information’ on the wing can be overwhelming. What I try to do, if I have time, is to sketch one feather from each of the relevant feather tracts. Then, once the bird flies away, at least I have some basic information to fill in the gaps.
3. Sketch the same species more than once. The more familiar you become with the patterns on a particular species, the easier it will be to take in details.
4. Don’t feel the need to sketch the whole bird. Try concentrating on the parts that you can see. I find it helpful to have several sketches “on the go” simultaneously. As the bird shifts position, you can keep adding information to your sketches.
You can maximise your time by having several sketches in process. Don’t worry if you cannot finish all of them.Drawing the head at several angles means you can keep adding bits as a bird shifts position.
Well done to Michelle for having a go at this (on Facebook). For you, and anyone else who had a try, here are the answers:
For some reason, there is quite a bit of resistance from some folks when they are confronted with a list of terms like this. But really? Many of them are common sense and in general use already. It’s not that much to learn and doesn’t require a great deal of effort. Soon they will become second nature, and I guarantee you they will help you get a lot more out of your hobby and become a better birder.
Now, back to sketching. Later, we will explore other ways to take notes which don’t involve sketching, but for now, I want to encourage you to give sketching a go. As I said in an earlier post, most people can, they just don’t.
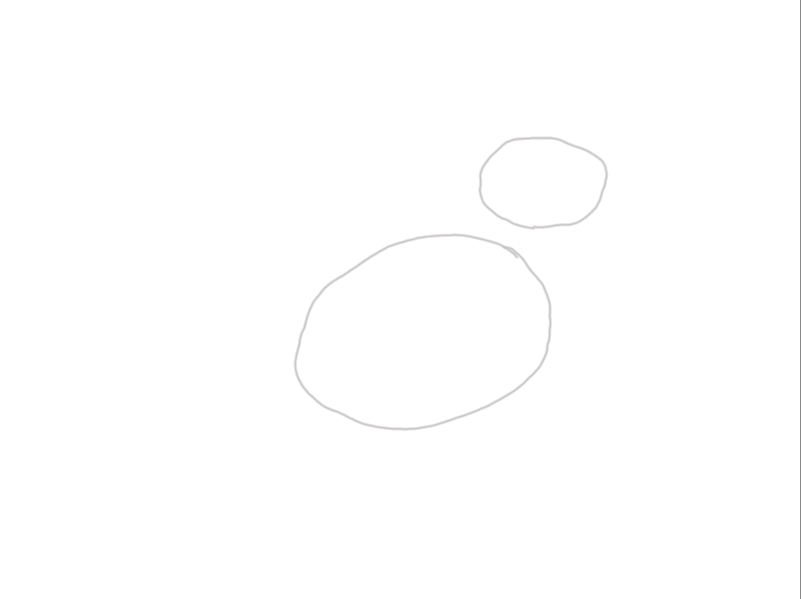
If you’ve ever attended any kind of birding for beginners course, you’re probably already familiar with the “egg method”. But, for those who are not…
Draw an egg – fairly large and somewhat centrally on your paper:
2. Draw a smaller egg where the head is:
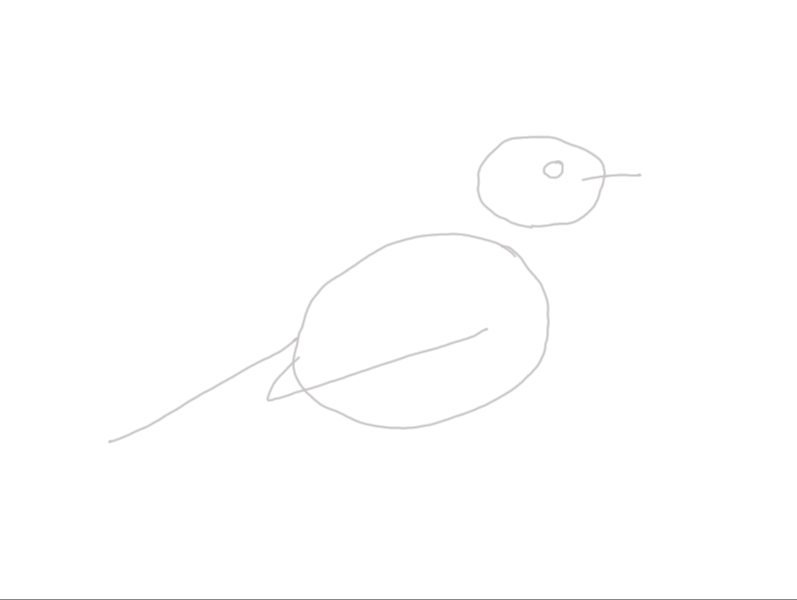
3. Add lines for for the bill, wings and tail, (paying attention to length and shape) and an eye:
4. Join the head and body and add legs:
Gradually fill in the details, focusing on whichever part of the bird is visible. For example, if the bird turns its head away, work on the body till the head turns back. I find it helps to put a few lines in to indicate the position of different feather tracts.
Complete as much of your sketch as you can while actually watching the bird. If it moves out of view, quickly add in whatever details you can remember. Leave blank anything you are not sure of. You can add notes about size, shape, calls, behaviour, etc.
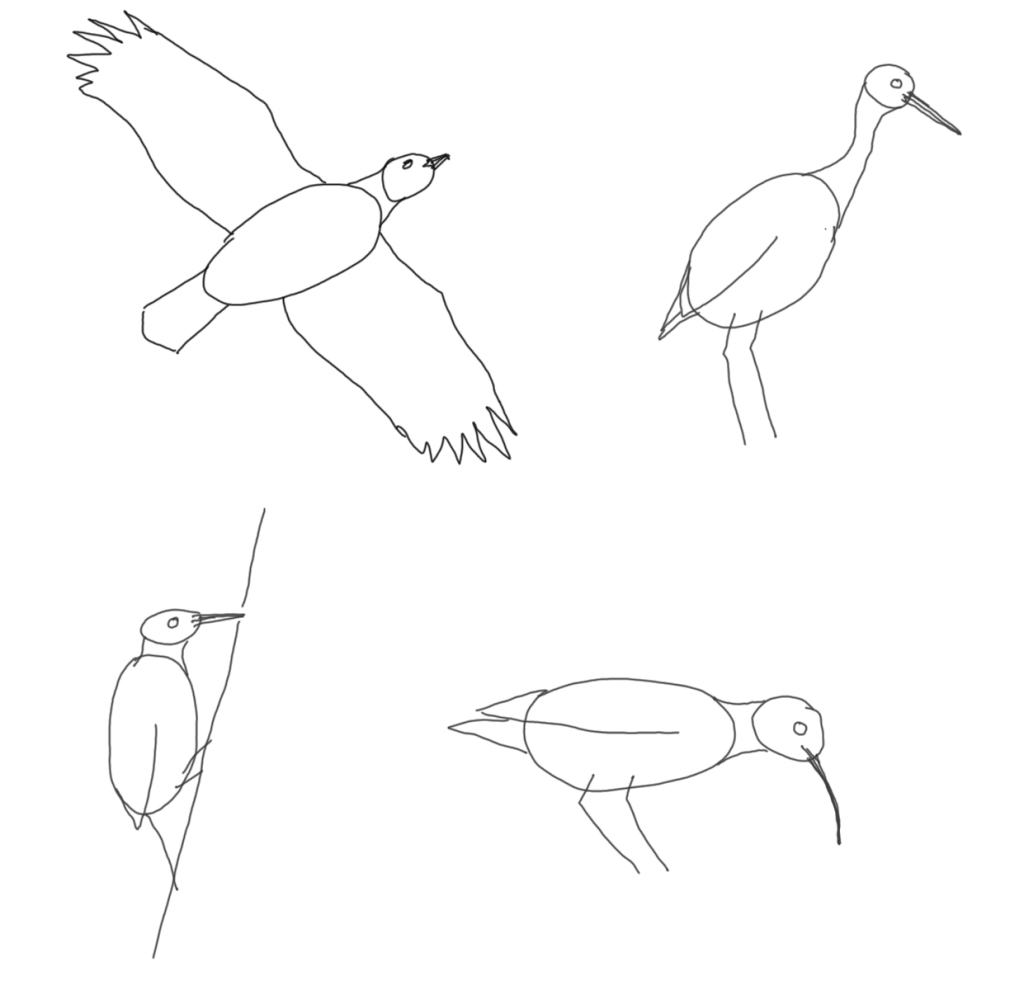
By varying the proportions of your drawing, you can draw many different types of birds:
A flying raptor, an egret, heron or stork, a woodpecker and a shorebird/wader.
To give you an idea of how this works in real life, click on this video.
I hope this post gives you some idea of how to get started. Before too long, you’ll probably be able to dispense with the eggs. If you keep at it, you will find that not only are your sketching skills improving, but more importantly, your observational skills will become sharper. You’ll find it easier to identify the commoner birds and you’ll be quicker to spot something which isn’t quite as common. Here are few examples to whet your appetite!
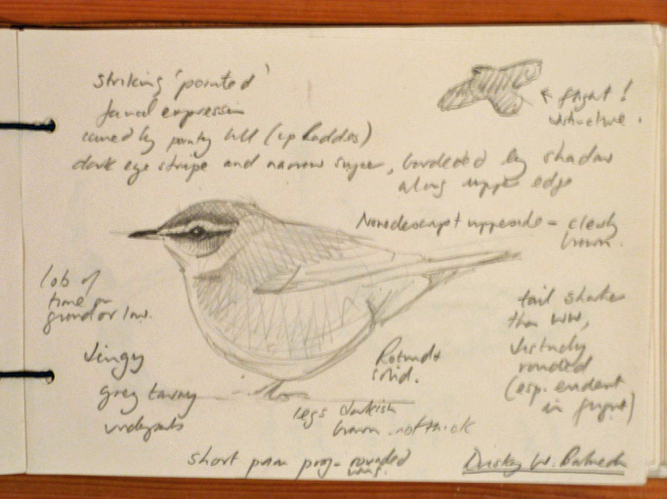
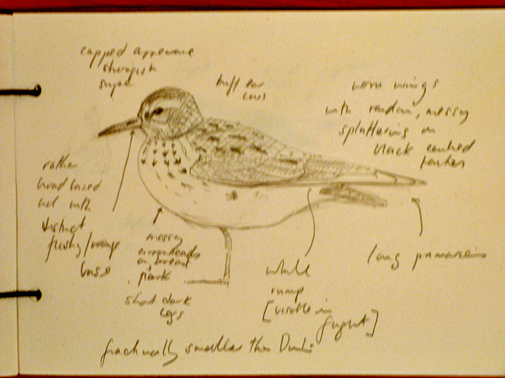
Field notes on a Dusky Warbler. Chris GibbinsField notes on a White-rumped Sandpiper. Chris Gibbins.
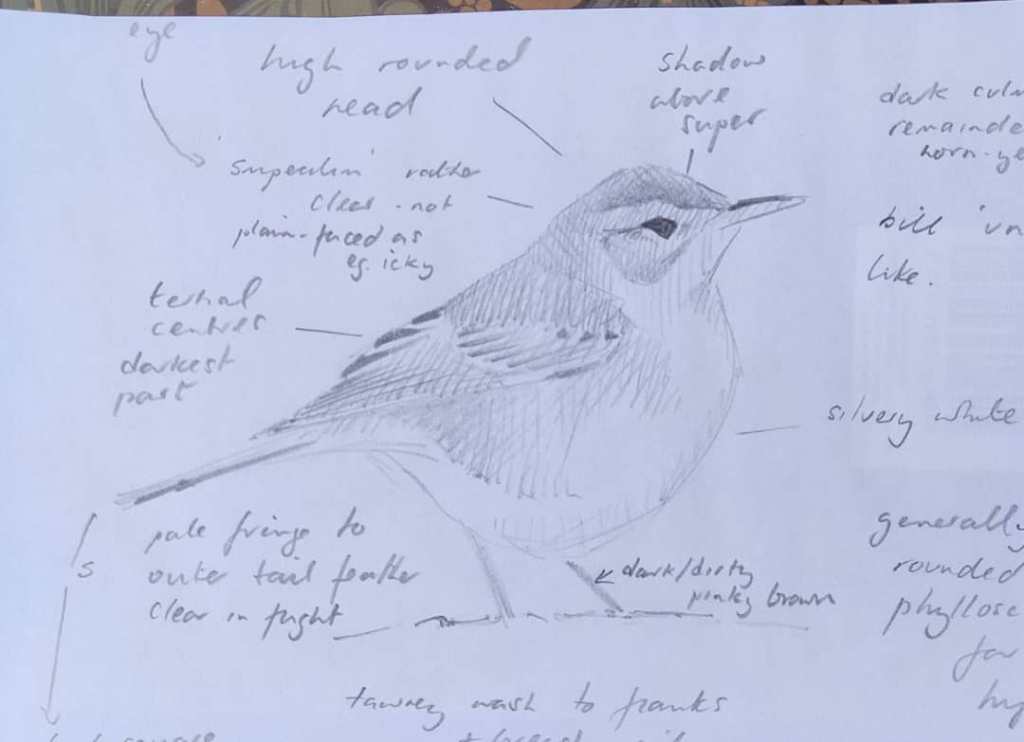
Field notes on a Caspian Gull. Chris Gibbins.Field notes on a Booted Warbler. Chris Gibbins.
As you can see, Chris doesn’t actually need to draw the eggs any more, but you can still see the egg shapes in his drawings. The skill of field-sketching is a basic building block that will develop you from someone who just looks at birds, to someone who really knows their birds. Start today, and keep, at it!
What’s wrong with this picture? Well, too many things to mention, but the one I want to draw your attention to is the arrangement of Big Bird’s feathers. He’s got no feather tracts! Bird feathers do not just grow randomly all over a bird’s anatomy. They are arranged in groups, known as tracts, and, since almost all birds have the same arrangement of feather tracts (penguins are one exception), it is well worth becoming familiar with them.
There are loads of good websites about bird topography (and some bad ones!), so I won’t reinvent the wheel here. Here’s a good primer, although it uses American English terminology (so Brits would use “ear coverts” instead of “auriculars” and “axillaries” rather than “axillars”). Here’s another, and if you want to test yourself to see how much you’ve remembered, here are lots of bird topography quizzes.
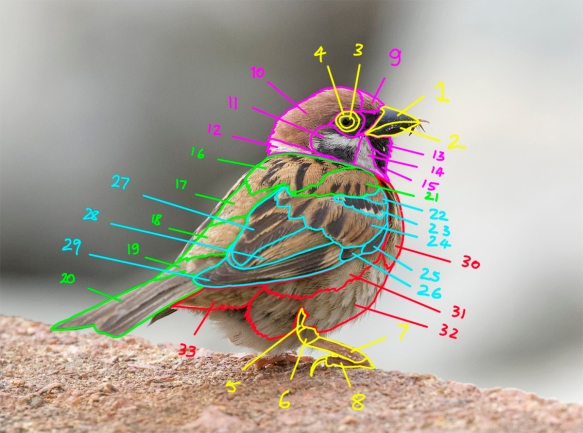
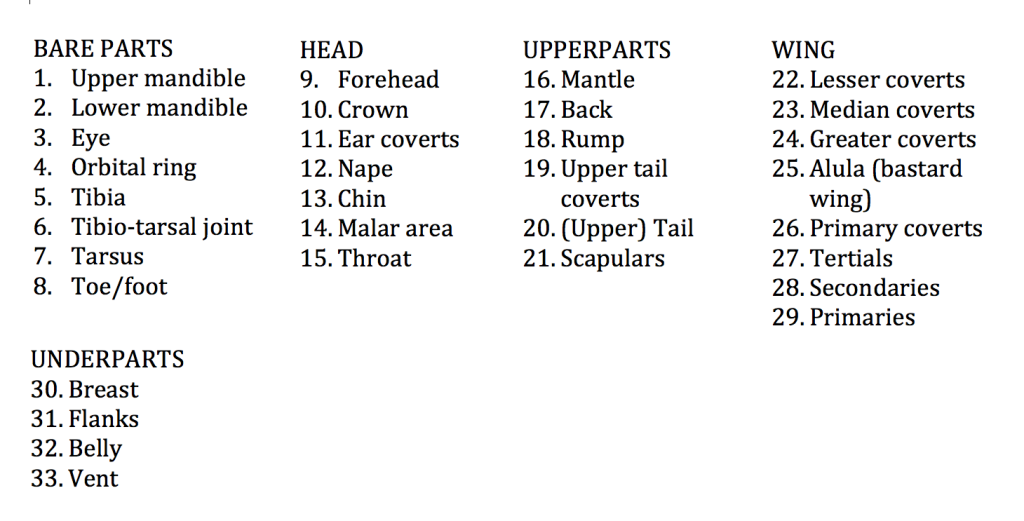
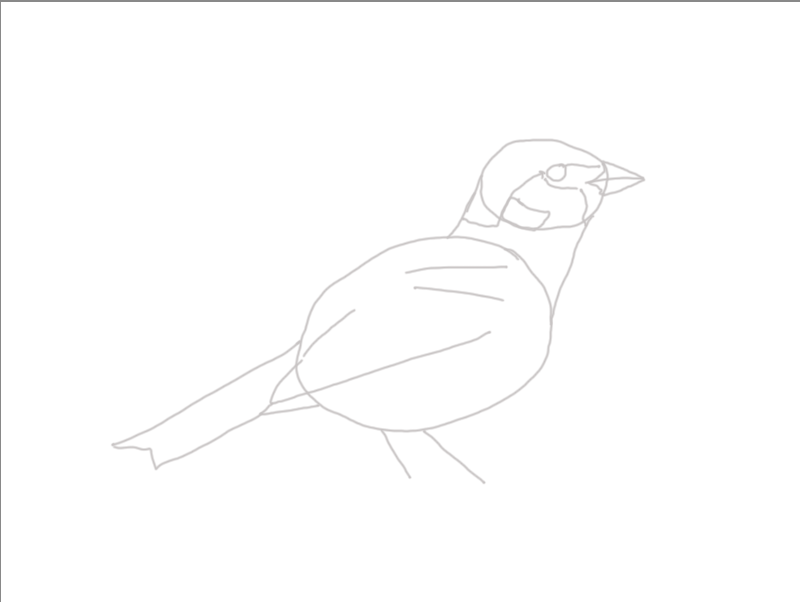
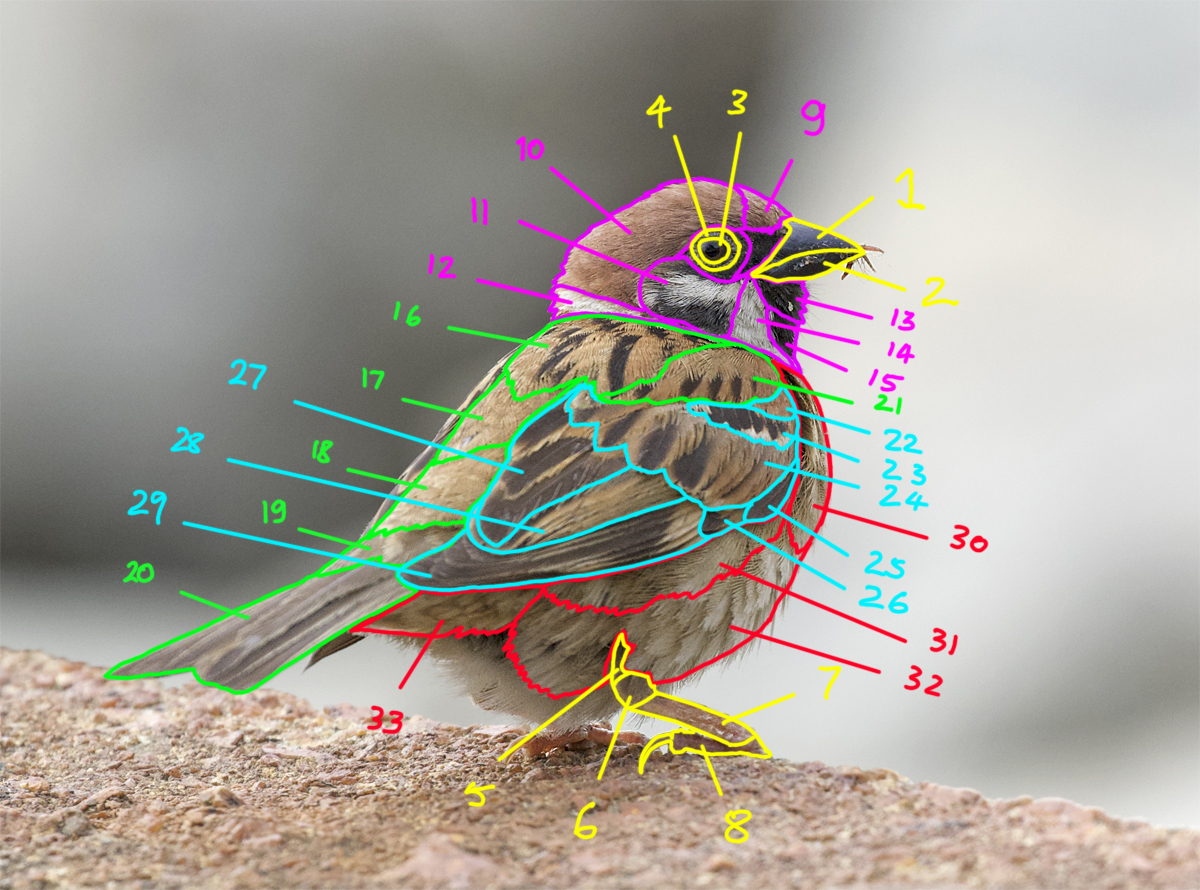
Knowing your feather tracts is a huge help in understanding what you see. Going back to our Eurasian Tree Sparrow, for example, knowing the feathers tracts will greatly help you understand how the patterns of colour are arranged. Otherwise, they are just random blotches.
Usually, when describing a bird, we divide it up into 5 basic areas: 1. Head 2. Upperparts 3. Underparts 4. Wings 5. Bare Parts (Eye and fleshy bits around it, bill, legs).
Then, each of those five areas are broken down into smaller parts, corresponding with feather tracts on the feathered parts of the body and various sections of the bare parts.
There are about 30 – 40 terms you need to become familiar with to accurately describe a bird. This is too many to remember at one go, so it is helpful to print out some of the topographical diagrams in the links above and paste them into a notebook, or keep them somewhere where you can refer to them often.
After you’ve referred to the links above, and when you think you’ve got a reasonable idea of the terms and what they refer to, have a go at labelling this annotated photo. The five colours refer to the five basic areas. Send me your lists in the response section. Have fun!